December – the most festive month is knocking on the doors and we all relate this month to the best time of the year. It’s the time that warms your heart even though is cold outside. It’s the time when we all start thinking of the past months – what we’ve achieved, what we’ve done bad, what we want to achieve in the New coming year. But it’s also the best time of the year because everyone is gathering together, it’s family time, waking up on Christmas morning opening the presents together, having joy…Christmas is all about this, isn’t it?
It’s also about the little things that make you smile such as the following Christmas crafts we’ve collected with lots of love.
??? It’s time to make this magical holiday. Miracles do happen around Xmas! ???
Making Christmas ornaments together is making memories that will last forever, and what better way to be creative under the rhythm of Christmas carols.
Christmas crafts for an amazing time with the family
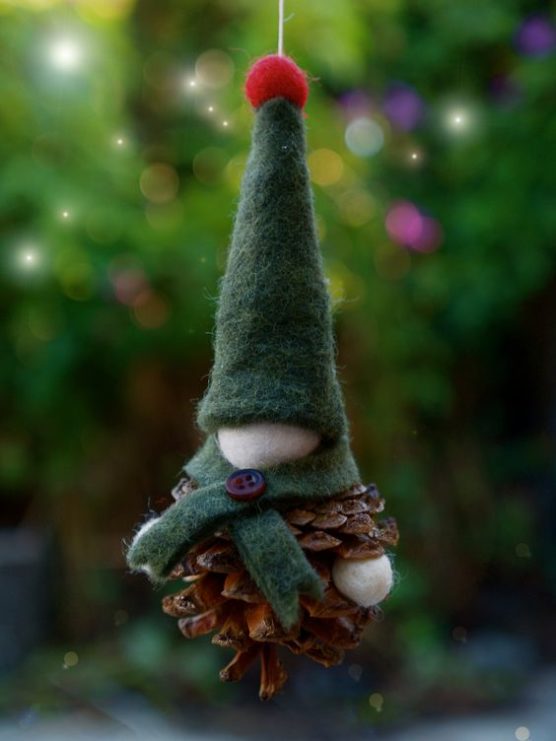
1. Gnome decoration
Before starting this, go on a hunt for pine cones in the nearby parks or forests. Spend a fabulous time with your family. When you got back perhaps you will freeze to the bones but make yourself a cup of hot chocolate with marshmallows and start creating!
Hopefully, you didn’t forget about the pinecones, did you?
This DIY activity would probably take the time you brush your teeth for. It can be done in just a few minutes, but the results are brilliant and your kids will love it.
?? What materials will you need?
- Small pinecone
- Hot-glue gun and glue sticks
- 1 white pompom or white cotton ball
- Red felt
- Scissors
?? Instructions:
- For the cap, cut the felt into small pizza shape slices, using the size of your pinecone as a guide. Overlap the bottom ends of the felt to create the cone hat; hot-glue along both edges and stick a pompom either side.
- For the arms, cut a pipe cleaner in half and cut tiny mittens of felt for hands; glue onto the pipe cleaner ends.
- Cut a piece of felt to make the scarf and stick it around the head pompom.
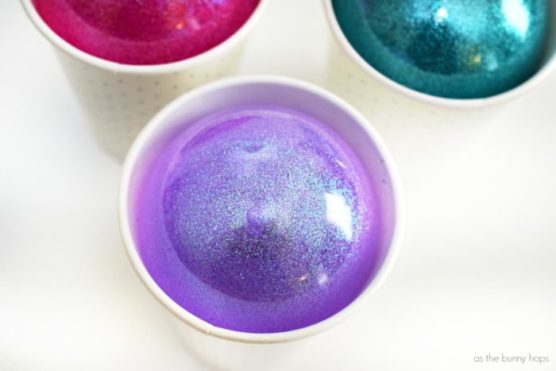
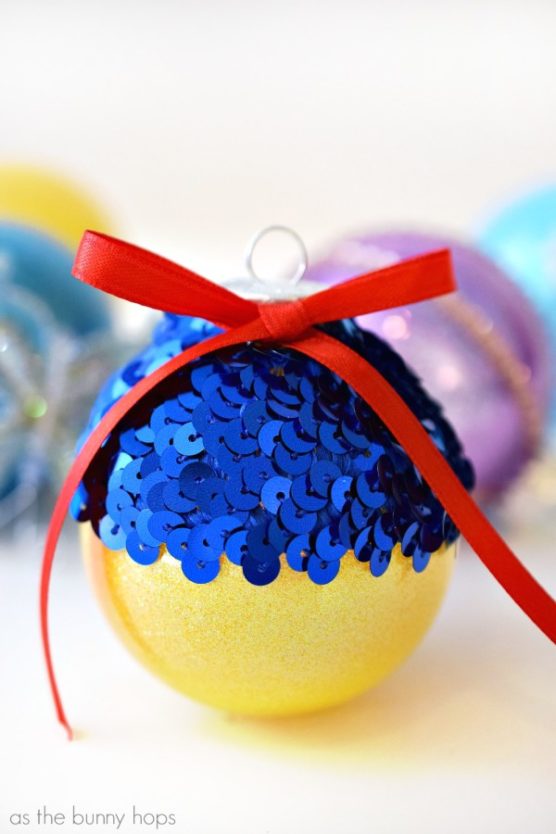
2. Disney Princess Ornaments
Turn on the Disney channel and turn your favourite Disney princesses into a Christmas ball. Weird or awesome, you will love it and especially your little princess. However, if you can’t choose your favourite Disney princesses or you want your Christmas tree to be inspired by the Disney theme, here you can see a guide of how to make almost every princess, from Elsa to Cinderella and Rapunzel.
We’ve chosen Snow White.
?? Materials needed:
- blue sequins
- red strip
- unbreakable plastic ornaments
- glitter
- clear acrylic finish
You’ve got everything to start!
Pour a small amount of the acrylic finish into a cup or bowl, then put the ornaments inside the cup. Slowly clutter the finish until the ornament gets completely coated, then take the ornament out and place it into a clean cup. Leave it for about half an hour to completely dry. After that, use any remaining of the finish to paste it on the ornament. Then pour in your glitter, and stir it carefully to fully coat the ornament. Then invert it again over a paper cup to dry overnight. Now go to sleep and in the morning you will have your Disney Christmas ball!
Once is dry, to finish up the Snow White, we need to glue the blue sequins on the top of the ornament and add a red bow with another glue dot. Our Snow White is ready to hang on the Christmas tree!
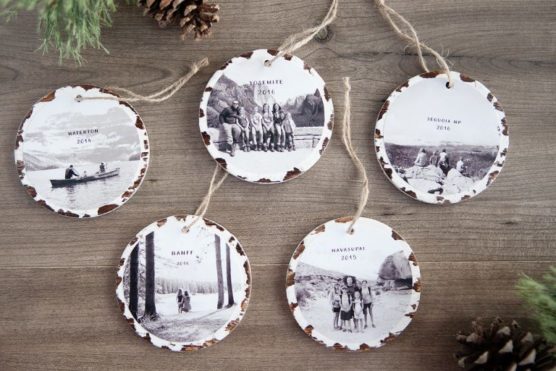
3. Photo ornaments
For this DIY workshop, you won’t only have fun, but you will capture some beautiful moments together as a family. You might need to undergo a photo shooting before being able to start decorating your next ornament.
?? Supplies:
- Round distressed wood ornaments
- twine
- Matte Mod Podge
- Scissors
- Printed Photos
- Photo Editing program or PicMonkey
- Hole Puncher
Have fun filling your Christmas tree with family memories.
?? Instructions:
- When you are done with the photo shooting, you can crop the photos into circles using a photo editing program on your mobile phone or you can do it online using PicMonkey’s free text editor. Then you can add a text on the photo saying where and when it was taken.
- Print your photos in a 4×6 size.
- Cut out your circular photos and punch a small hole at the top in line with where the hole is on the ornaments.
- Now apply a generous layer of Mod Podge. You’ll need to work quickly, making sure your mod podge covers the surface of the ornament entirely and that you have an even layer.
- Next, apply a quick layer of the mod podge to the back of your photo. Place the photo on the wood ornament making sure it’s centered. Apply a final layer of mod podge on top of the photo to seal it.
- Once the mod podge is completely dry, needle a length of twine through the hole at the top of the ornament and tie it in a knot. Now hang them on your tree and turn it into a family photo album full of memories.
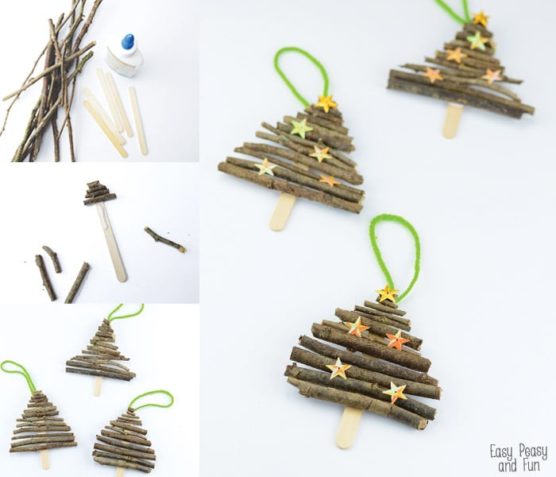
4. Popsicle Stick and Twigs Christmas Tree Ornaments
If you don’t have your Christmas tree out yet, we advise you to start with little preparations before the big decoration comes. Indeed, this Christmas craft will take you no more than five minutes plus above all it looks so good when you hang it on a lamp! In addition, your little angels will have lots of fun taking part in this mini-workshop.
This entertaining craft to make doesn’t need a lot of materials and it’s for beginners.
?? What will you need?
- popsicle sticks craft
- twigs and branches
- white school glue
- scissors
- yarn
- sequin or other decorations
Start with a walk in nature to get your twigs and branches. Use scissors and break up the twigs to get different lengths. Apply a considerate amount of glue along 3/4 of the popsicle stick. Start gluing the shortest twig on the top, adding the larger ones till bottom. Let it dry completely.
Glue on yarn at the back side, if you wish to hang this popsicle stick tree ornament.
You can leave them as they are or develop your creativity and add sequins, pom poms or whatever you wish for a final touch for a more festive look.
So, that was it! Let your imagination create miracles for Xmas and don’t forget to take photos of your DIY crafts, we will publish your crafts on our social media channels! We will be also happy to hear some more ideas about Christmas crafts and if you love Christmas, then you can’t skip the most beautiful Christmas markets of Alsace. ??